Before we begin, I want to preface this episode by saying that before you start any formal writing instruction, you want to make sure that kids actually know some of their letters and the sounds that they make before they’re going to be able to write them on paper. But when you do first start writing in kindergarten or first grade, you want to begin with teaching kids to label a picture.
So let’s talk about why you should start with labeling and what that actually means. When kids first pick up a pencil at around three or four years old, the first thing they want to do is draw a picture. They’re usually going to draw their house, or a family member, or a simple picture of the sun. We’ve all seen those first drawings [00:02:00] from kids, but when they get to school, we want to bridge that gap between drawing and writing.
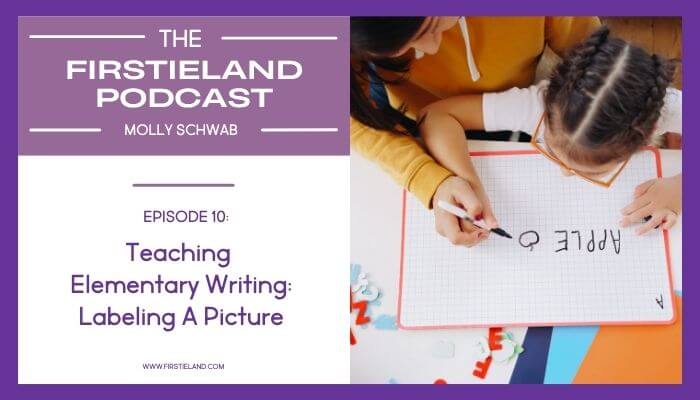
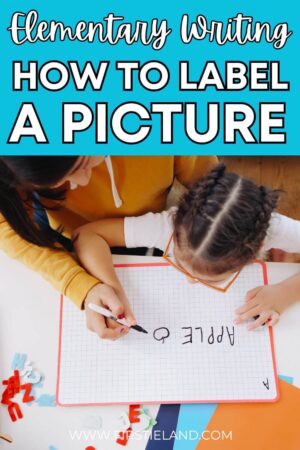
And so, showing kids how to label their pictures is the way to do that. Labeling is basically when kids write one or two words to tell about a picture. The reason you want to begin with labeling is because it’s going to help build their confidence as writers. You want to start slowly so they don’t get frustrated and upset and just want to quit.
Labeling also really helps teach kids how to stretch out words and listen for the sounds that they hear. Labeling supports kids who aren’t ready to write a full sentence yet.
So when do you want to start this with your students in kindergarten? You want to get the basics down first. Make sure kids can hold a pencil correctly and that they have some letter-sound knowledge. In first grade, you can begin labeling with your students almost from the very beginning. Within the first couple of weeks of school, we’re going to assume that [00:03:00] incoming first graders know most of their letters and sounds and have already had some practice labeling in kindergarten, so they’re ready to begin right away.
And even though first grade kids have had some writing experience in kindergarten, I think it’s still a good idea to begin your writing instruction in the fall with labeling because you have to remember that the writing standard for kindergarten is that kids will use a combination of drawing, dictating, and writing, so their writing is still going to be pretty limited when they get to first grade.
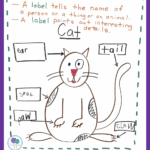
So how do you introduce labeling to your students? In my classroom, I created an anchor chart with the title What is a Label? and underneath it said A label is a word that tells about a picture. I would draw a big picture of a cat or a dog and I’d put little lines next to the different parts of the animal. I’d put a line next to the ear, the tail, the foot, the mouth, and then I’d write those words on the chart. I’d have this all made up before I started the [00:04:00] lesson. So if you can sort of picture that in your head, that’s what the anchor chart looked like, and you’re going to want something like that to direct your writing lesson.
When you begin to teach kids how to label, gather together at the carpet for your first writing lesson and show your class the anchor chart. Explain to them that you’re going to learn how to label a picture. Start off by asking your class, “How many of you know some of the letters of the alphabet?” Of course, they’re all going to raise their hands. Then you’re going to ask them, “How many of you know that letters make sounds?” Most of them are going to raise their hands for that too. Then you say, “Did you know that when you put letters together, they form words?” Some of them might raise their hands for that too. Then you’re going to tell them, “Would you like to be able to write words all by yourself? Well, today I’m going to show you how to do that.”
Start your lesson off getting them pumped up and excited about it. Then show the kids the anchor chart and tell them that [00:05:00] today they’re going to learn how to write words to label a picture. Show them the chart and explain to them that you’ve labeled the different parts of the cat or the dog or whatever it was you drew and say, “I wonder if anybody can read these words.”
They probably won’t know how to read them yet, but point to the word, maybe say the word “tail,” and say, “Do you notice how this word is right next to the dog’s tail? I wonder what it says.” Call on somebody to tell you what it is. Then tell them, “That’s right. This word says tail. I know that because when I look at the letters, I see that they make the same sounds that I hear in the word tail.” Stretch that word out and show them how the sounds that you’re saying are the same letters that they see. Do that with all the other words on the chart too.
When you’re done, tell them that you’re going to draw a picture together and label it. Pick something really [00:06:00] simple, like maybe a house. Ask the kids to help you label some of the parts of the house. Call on one student — I usually tried to pick someone who I thought had a really good background in letters and sounds and who was going to be able to do the task because you want to show the kids that it’s not hard and they can do it too.
Make a little line next to maybe the door of the house and ask the student you pick to help you stretch out the word door. Say the word slowly and ask them what they hear at the start of the word. When they say D, tell them to write it on the line. Then stretch the word again and ask them what they hear after the D. They might go straight to the last sound, and that’s okay. Many kids can’t hear medial sounds at the beginning of their writing journey. Even though you want to encourage kid spelling when they’re working on their writing individually, whenever you’re presenting anything to the whole class, you always want to spell the words correctly. If the child says they hear an R at the end, you’re going to tell them that’s right. Between the D and the R are the letters OO, and you’ll write those. Then you let that child write the ending sound of R.
Continue this process with a couple more kids, labeling maybe the roof or the window or just the word house. When you’re done, get them pumped up and say, “Wow, look! You just helped me label this picture of a house. You guys are writers!” Then have them go back to their seats and try it for themselves. Give everybody a sheet of paper. Have them draw the same thing that you just did — if you did a house, have them draw a house, or whatever it was you decided to do your labeling on. Take your picture with the labels on it off the board or turn it over so they can’t just copy it. Tell them now it’s their turn to try labeling.
A lot of kids are going to struggle with this. They might have a hard time remembering how to form different letters or they might struggle with stretching out the sounds. That’s okay. It takes kids time to learn how to do this, and that’s why you start with labeling — because it’s very simple writing. The first time they do this, they may only get one word on the page and it probably won’t be spelled correctly. Many kids will only be able to write the beginning sound of each word. Some kids might be able to hear the beginning and the ending sounds, and that’s fabulous. Then there will be those shining star kids who will be able to write some actual words or maybe even a sentence. The beauty of this kind of lesson is that you can differentiate it for every kid in your class and let them write exactly what they’re ready for.
For most kids, you want to keep it very simple at first — just one or two [00:09:00] labels. You need to model this over and over. Labeling can go on for at least a couple of weeks in first grade and much longer in kindergarten. Every day, choose something simple to draw and have kids come up and help you label it, then send them back to try it on their own.
Eventually, you’re going to want to have them draw something totally different than you. For instance, maybe you decide for your labeling lesson you’re going to draw a family member — so maybe you draw and label a baby. Then tell the kids they can draw and label anyone in their family or maybe their whole family. Maybe one day you decide you’re going to draw and label a monkey, then tell your class to draw and label any animal in the zoo — or they could draw the whole zoo and label all the different parts.
The point of labeling is to have kids practice stretching out words and listening to the sounds they hear and then writing them down. If you have kids who are really struggling, you can give [00:10:00] them a mini word wall to help them write hard words. Another way to really help kids is to make lines next to the picture that they drew so they know where to write the word. For instance, let’s say they’re labeling a dog. You could make two lines next to the dog and tell them to listen for the starting sound and the ending sound and then write that on the two lines. So they’re going to stretch the word dog — dog — and write the D on the first line. Then tell them to stretch the word dog again — what do they hear at the end? — and write that on the second line. For some kids, you are really going to need to hold their hand through this process of labeling a picture until they feel confident enough to do it on their own.
And praise, praise, praise! Tell them how great their writing is, how you love how they heard all the starting sounds or all the ending sounds. Tell them how good their letters look and how you love how they tried to write three words or two words or whatever it is. Just really build them up so they begin to feel confident. Whenever you finish your writing lesson for the day, tell them what great writers they are. I used to say stuff like, “Did you know that you could write that many words? That is really good writing!” Stuff like that builds them up because most kids aren’t going to have a lot of confidence in the beginning, so you need to pump them up.
Some other ideas for getting started with writing are to have a writing notebook of some kind. It’s great to use the same notebook all year because you can really see the progression from those first writing activities of just writing labels to the end of the year where they’re writing full paragraphs. If you work on writing every day for just a little bit and take it slowly, especially in the beginning, you are going to see kids writing those paragraphs in May.
Another idea is to have kids help you label the different places and objects in your room. You can get some sentence strips and [00:12:00] cut them into smaller sizes, then have kids help you label your centers, your mailboxes, cubbies, your desk, the door, the clock — anything in the room — and then hang those labels next to the object. Kids can use them all year to help them in their writing.
You can also use some printable picture prompts to help kids with labeling. You could use coloring pages or special pages made just for labeling that have writing lines already on the picture. I used pages like those in my classroom and I had them for every season and holiday. We used them all throughout the year. Even when kids began to write sentences, they still enjoyed a simple labeling page occasionally, and it was great to have something like that for your struggling writers all through the year. I’ll put a link to the pages that I used in the show notes so you can check them out there.
So, what are some common mistakes that teachers make when they start teaching writing? I think one of the first things is rushing kids into writing sentences too soon. [00:13:00] It’s okay to start slowly. You want to build that good foundation of how to stretch out words and listen for all the sounds because that’s going to be needed as they move into writing harder things like sentences, narrative writing, reports, and everything else. Letters, sounds, and words are the foundation to all writing, so you really want to get that established before moving on.
Another common mistake that I see teachers make is having kids copy sentences from the board and then drawing a picture to go with it. That’s really not writing — that’s basically eye-hand coordination and copying. I really think the only place for that is in your handwriting lessons, which is totally different from writing. Handwriting is teaching kids to form the letters correctly, and there’s definitely a need for that in kindergarten and first grade, but don’t mix that up with writing. They are two totally different things.
And then finally, another common mistake teachers sometimes make is not celebrating invented spelling or kid spelling. That basically means letting kids sound out words and write what they hear instead of spelling the words correctly. It’s fine for kindergarten and first grade kids to spell things the way they sound. Remember, in first grade, it takes most of the year to learn all of the phonics skills like blends, digraphs, vowel teams, and word endings. If you waited for kids to know all of that, you’d never be able to have them do any kind of writing at all! So let them make those mistakes in their own independent writing. Just make sure that when you are working together in shared or interactive writing as a whole group, you always spell the words correctly. That’s how they learn.
All right, so just to recap, remember that you want to build that writing foundation slowly by having kids practice labeling. You can have kids draw pictures or use pre-made pages for them to label, and it’s perfectly okay for them to use kid spelling in their work. Don’t rush to write sentences until you [00:15:00] feel like your class has a good foundation, but if you have kids who are ready, you can always differentiate for them by having some kids label a picture and other kids write a simple sentence about the same picture.
I made a special freebie for you with a few labeling pages that you can grab in the show notes, and your homework for this week is to give them a try with your class. Snap a photo and share it on Instagram and tag me in that photo — I’d love to give you a shout-out in a future episode.
Okay friends, that’s it for today. You can find everything mentioned in this episode in the show notes, and as always, remember to make learning feel like play. See you next week!
Thanks so much for tuning in. I hope you’re walking away with some great tips that you can use right away. Be sure to hit the follow or subscribe button so you never miss an episode. And if you’re enjoying the podcast, I’d love it if you’d leave a review. You can find the show notes and links for everything mentioned in this episode at firstieland.com.
I’ll [00:16:00] see you next week in Firstieland!